Design - Create - Grow


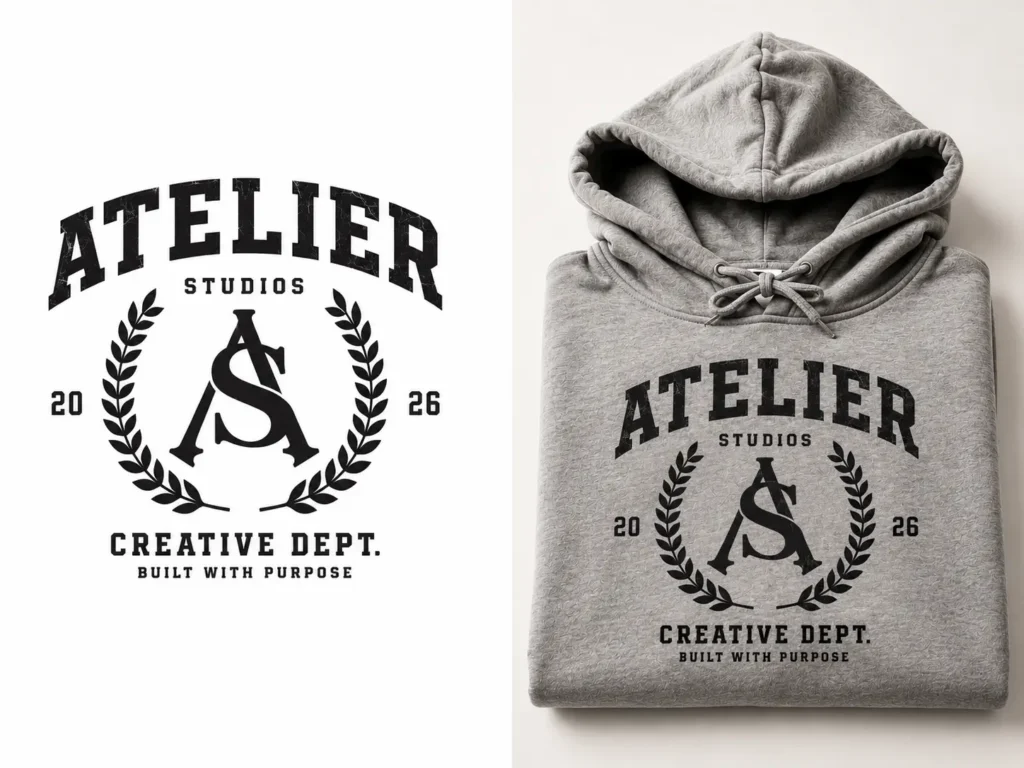
If you’ve ever spent your last few hundred dollars on a photo shoot just to see your designs look stiff and lifeless on camera, you’re not alone. Most new clothing brand owners hit this wall early — flat-lay photos that don’t show how a print will actually sit on a hoodie or tee, and no budget left to fix it.
That’s exactly why learning how to use Photoshop mockups for clothing is one of the highest-leverage skills you can pick up as a beginner designer. It’s the same method used by established streetwear labels and print-on-demand sellers to preview products before a single unit gets printed.
Before choosing a specific mockup workflow, see our guide to the best clothing mockups for fashion designers for a comparison of Vector and PSD formats and the best options for different use cases.
In this guide, you’ll learn how to use Photoshop mockups for clothing from the ground up — what Smart Objects actually do, how to drop your artwork into a template step by step, and how displacement maps make your design follow the natural folds of fabric. By the end, you’ll be able to turn a flat PNG logo into a realistic, sellable product photo in minutes, not days.
No expensive studio. No model. No waiting on a sample order to know if your design works. Just you, a PSD file, and Photoshop.
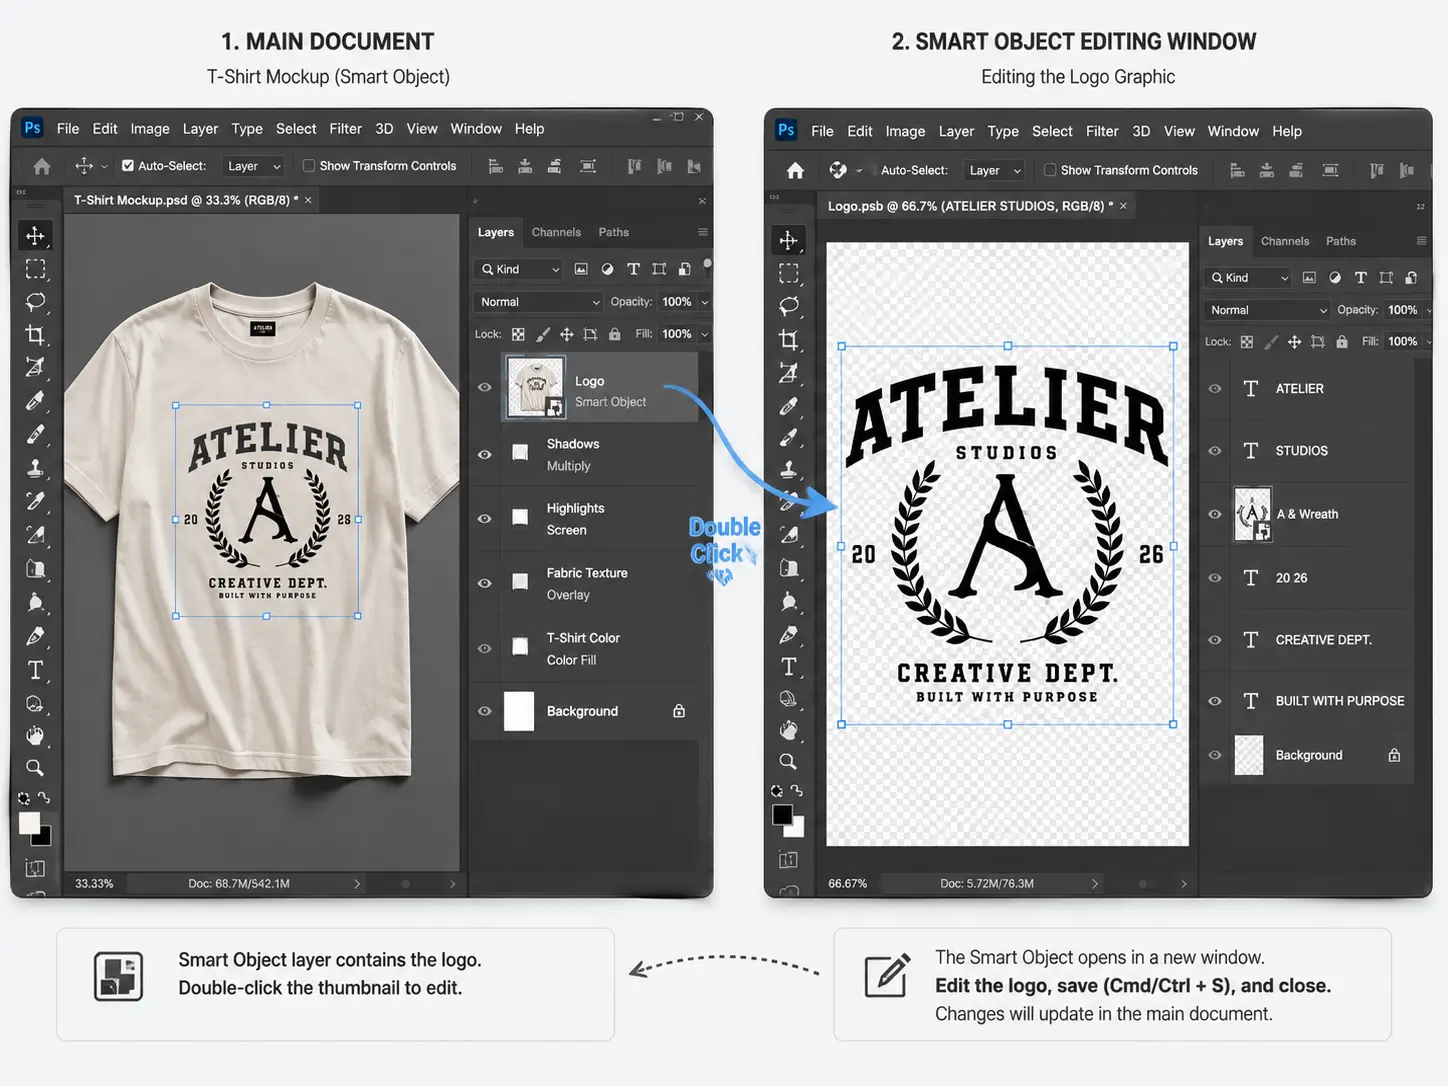
⚡Quick Answer: To use Photoshop mockups for clothing, open your PSD file, double-click the Smart Object layer, paste your graphic into the new window, and save (Ctrl+S). The design automatically wraps onto the garment’s folds, shadows, and texture.
What Is a PSD Clothing Mockup & How Does It Work?
A PSD clothing mockup is a layered Photoshop file that lets you place your artwork onto a pre-shot photo of a garment, automatically matching the fabric’s lighting, shadows, and folds. Instead of photographing every design on a real shirt, you “place” it digitally inside a template.
The magic behind this is the Photoshop smart objects clothing designers rely on. A smart object is a container layer — your artwork sits inside it, and the mockup file projects that artwork onto the garment with realistic shading already baked in.
Why PSD files outperform flat PNG previews:
- ✓ Editable at full resolution — zoom in without pixelation
- ✓ Realistic fabric folds and shadows applied automatically
- ✓ Reusable — swap designs in seconds instead of reshooting
- ✓ Color customization — change garment color without new photography
Common use cases for beginners:
- Pre-selling streetwear before committing to a production run, so you can gauge demand from real customer reactions
- Creating Shopify or Etsy listings that look professional and consistent across your whole catalog
💡 Pro Tip: Always work with the highest-resolution PSD available. Upscaling a low-res mockup later introduces blur that’s hard to fix.
Step-by-Step Tutorial: How to Use Photoshop Mockups for Clothing
This is the part most beginners overthink. Once you’ve done it once, the workflow takes under five minutes per design. Here’s exactly how to use Photoshop mockups for clothing, step by step.
Step 1: Open the PSD file in Photoshop Launch Photoshop CC and open your mockup file. Give it a moment to load — high-resolution apparel mockups can be large files with multiple layer groups.
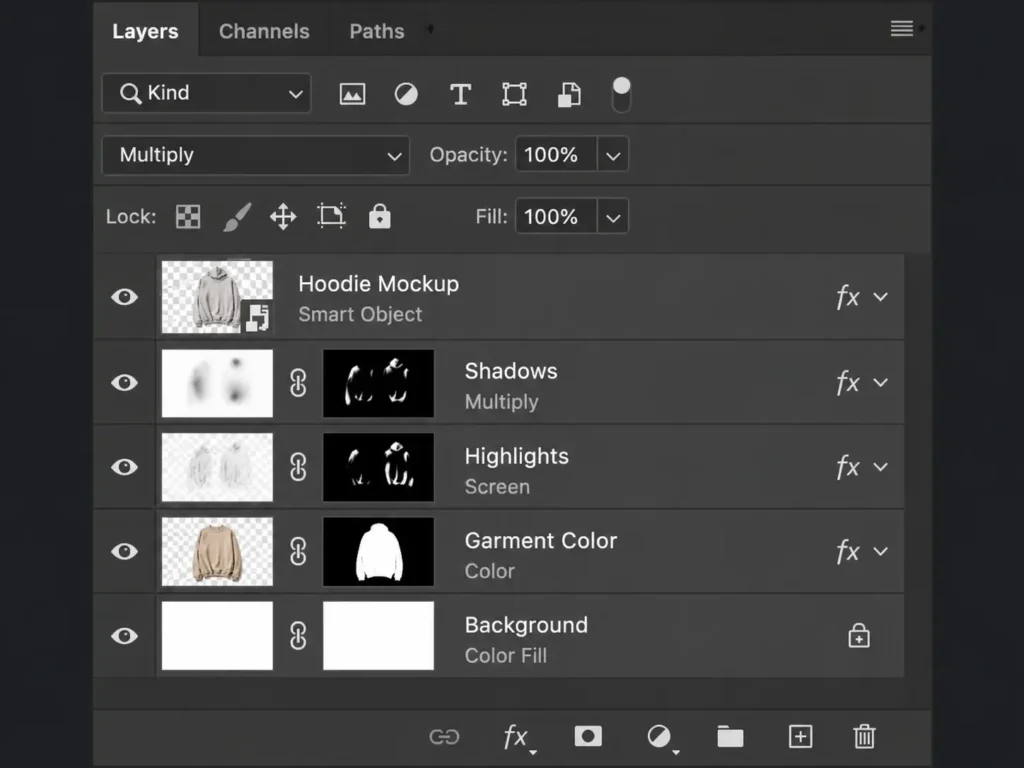
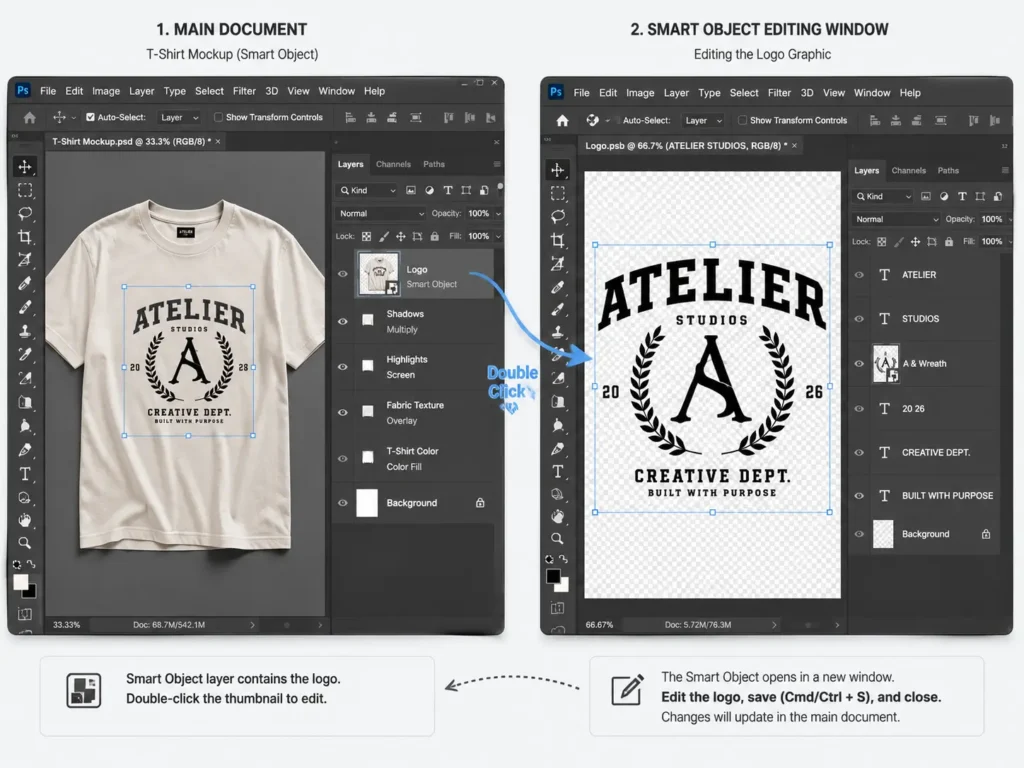
Step 2: Locate the designated Smart Object layer In the Layers panel, look for a layer labeled something like “Place Design Here” or “Double Click to Edit.” This is your Smart Object layer, and it’s where your artwork goes.
Step 3: Double-click the Smart Object thumbnail Double-clicking the thumbnail (not the layer name) opens a new, nested document — usually a .PSB file. This is a separate canvas just for your artwork.
Step 4: Import and position your graphic Drag in your logo or design file, then resize and center it using Free Transform (Ctrl+T / Cmd+T). For crisp results, use graphics at 300 DPI — anything lower will look soft once it’s mapped onto the fabric.
Step 5: Save the Smart Object and return to the main document Hit File > Save (Ctrl+S / Cmd+S) and close the nested window. Photoshop automatically updates the main mockup with your design wrapped onto the garment.
Step 6: Customize garment color and background Most quality templates include separate color and background layers. Use Hue/Saturation adjustment layers (often pre-built in the file) to recolor the garment without touching your artwork.
For more advanced texture realism, mockups use a displacement map — a grayscale layer that tells Photoshop exactly how to bend your flat design around sleeves, collars, and fabric creases. You typically won’t need to touch this layer; it works automatically once your art is placed in the Smart Object.
Top 7 Clothing Mockup PSD Templates to Practice With
Reading about it only gets you so far — the fastest way to learn PSD mockup tutorial clothing brand workflows is to practice on a real file. Below are seven templates worth trying, ranked by who they’re best for, with honest pros and cons for each.
1. S.i. Graphics Clothing Mockups Starter Pack — Best for Beginners
Price: $19.99
This is the simplest entry point for practicing the exact Smart Object steps covered above. It includes a small set of clean, front-facing garment shots with clearly labeled layers — no clutter, no confusing layer groups.
What’s included: 10 PSD files, front/back views, pre-organized layers panel, basic color-change layers.
Best for: First-time mockup users who just want to nail the Smart Object workflow before investing further.
Pros:
- ✓ Beginner-friendly layer naming
- ✓ Lightweight files that open fast on slower computers
- ✓ Affordable way to test the workflow
- ✓ Commercial license included
Cons:
- ✗ Limited garment variety (basic tees and hoodies only)
- ✗ No techpack or social media layout extras
2. S.i. Graphics Streetwear Mockups Bundle — Best Value for Streetwear Brands
Price: $19.99
Once you’re comfortable with the basics, this bundle expands into the cuts streetwear brands actually sell: boxy tees, oversized hoodies, zip-ups, and cropped fits, all with realistic apparel mockups texture and fabric weight.
What’s included: 25+ PSD files, multiple angles per garment, pre-built displacement maps, layered shadow groups.
Best for: Streetwear startups who need their catalog to look cohesive across drops.
Pros:
- ✓ Wide variety of trendy streetwear cuts
- ✓ Realistic fabric texture and weight
- ✓ Easy color-swap layers for each garment
- ✓ Good value per file compared to single mockups
- ✓ Commercial license for Shopify/Etsy use
Cons:
- ✗ Larger file sizes require a reasonably modern computer
3. Marketplace Mockup Pack (Generic Stock Marketplace) — Best for Basic Web Previews
Price: Roughly $5–$12 per pack (varies by seller)
Stock marketplaces such as Creative Market or Etsy’s digital goods section sell individual clothing mockup PSDs from independent designers. Quality and layer organization vary a lot from seller to seller, so check reviews before buying.
What’s included: Typically 1–5 PSD files per pack, basic Smart Object setup.
Best for: Sellers who need one or two quick previews and don’t mind some trial and error.
Pros:
- ✓ Very low cost per file
- ✓ Huge selection of niche garment types
Cons:
- ✗ Inconsistent quality and layer naming between sellers
- ✗ Licensing terms vary — always check before commercial use
4. Premium Studio-Shot Mockup Subscription (Generic Premium Source) — Best for Ultra-High-End Customization
Price: Roughly $20–$40/month for subscription access
Premium mockup subscription services (the kind used by larger DTC apparel brands) offer studio-quality, multi-angle shots with advanced relighting controls. They’re built for teams that need flexibility across hundreds of SKUs.
What’s included: Large rotating libraries of mockups, advanced lighting/shadow controls, frequent new releases.
Best for: Established brands with bigger budgets who need constant fresh content.
Pros:
- ✓ Extremely high production value
- ✓ Large, frequently updated libraries
Cons:
- ✗ Recurring cost adds up for solo founders
- ✗ Steeper learning curve for advanced controls
5. S.i. Graphics Clothing Mockups Mega Bundle Vol. 1 — Best Professional Expansion Pack
Price: $34.99
This is the comprehensive toolkit for brands ready to scale past single-product testing. It bundles techpacks, multiple garment angles, and premium fabric textures into one library, so your entire collection looks unified.
What’s included: 50+ PSD, AI files, techpack templates, multiple angle sets, premium texture overlays, and advanced displacement map presets.
Best for: Designers preparing a full collection launch or building a consistent brand catalog.
Pros:
- ✓ Comprehensive — covers nearly every garment type
- ✓ Includes techpacks for manufacturers
- ✓ Multiple angles per garment for richer listings
- ✓ Premium texture realism
Cons:
- ✗ Bigger investment than the starter tiers
- ✗ More files than a true beginner needs right away
6. Free Community Mockup Pack (Generic Free Resource) — Best Free Alternative for Quick Mockups
Price: $0
Free PSD mockups exist on sites like Mockup World or design-community forums, and they’re a fine way to test the Smart Object workflow with zero cost. Just be honest with yourself about the trade-offs.
What’s included: A small handful of free PSD files, basic Smart Object layer.
Best for: Absolute beginners testing the workflow before spending any money.
Pros:
- ✓ No cost to try
- ✓ Good for learning the double-click Smart Object motion
Cons:
- ✗ Often limited to one angle, with locked or simplified layers
- ✗ Many include visible watermarks until you upgrade
7. All-Over-Print Mockup Pack (Generic AOP Source) — Best for All-Over-Print Designs
Price: Roughly $10–$25 per pack
If your brand does sublimation or all-over-print garments, you’ll need mockups specifically built with flat templates for AOP printing rather than standard front-chest placement. These specialty packs handle the full-garment wrap differently than a typical chest-logo mockup.
What’s included: Flat AOP templates, seam guides, front/back coverage maps.
Best for: Sublimation and AOP sellers who need accurate print-area guides.
Pros:
- ✓ Purpose-built for full-garment print placement
- ✓ Includes seam/print-area guides
Cons:
- ✗ Less useful if you’re only doing standard chest-print designs
Quick Comparison Table
| Feature | Free Templates | Starter Pack ($19.99) | Streetwear Bundle ($19.99) | Mega Bundle Vol. 1 ($34.99) |
|---|---|---|---|---|
| Quality | Basic | Clean, beginner-friendly | High, streetwear-focused | Premium, studio-grade |
| Smart Objects | Often locked/limited | Fully editable | Fully editable | Fully editable + presets |
| Color Customization | Rare | Yes | Yes | Yes, advanced |
| Commercial License | Check terms | Included | Included | Included |
| Price | $0 | $19.99 | $19.99 | $34.99 |
| Support | None | Email support | Email support | Priority support |
How to Choose the Right Clothing Mockup Template
Not every mockup fits every stage of your brand. Here’s a simple decision framework to figure out what you actually need.
Consider these factors before buying anything:
- Your current design software — Photoshop unlocks full Smart Object editing; web-based mockup generators are faster but far less flexible.
- File flexibility — Can you change the garment color, shadows, and tags, or is everything locked?
- Commercial licensing — Confirm you’re allowed to use the final images on your Shopify or Etsy store listings.
- Resolution and detail — Zoom in. Can you see individual fabric threads, or does it blur immediately?
Choose starter packs if:
- ✓ You’re learning the basics
- ✓ You’re testing 1–2 designs
- ✓ You’re on a tight budget
Choose complete bundles if:
- ✓ You’re launching a full collection
- ✓ You need cohesive social media layouts
- ✓ You want techpacks included
💡Pro Tip: Buy one starter mockup first and actually complete the workflow end-to-end before committing to a bigger bundle. It’s the fastest way to know if a seller’s layer organization matches how you like to work.
Frequently Asked Questions
Do I need the latest version of Photoshop to use these mockups?
No, but a reasonably recent version helps. Most PSD clothing mockups are built in Photoshop CC and use standard Smart Object technology that’s worked the same way for years. As long as you’re running a supported CC version, you’ll be able to open and edit the layers without issues.
What is a Smart Object in clothing mockups and why does it matter?
A Smart Object is a special layer that holds your artwork in its own nested file. It matters because it lets the mockup automatically apply lighting, shadows, and fabric folds to your design without you manually painting any of that in. Edit the Smart Object once, and the main mockup updates instantly.
Why does my graphic design look flat or unrealistic on a mockup?
This usually happens when the lighting layers above your Smart Object are turned off, or the mockup lacks a proper displacement map. The displacement map tells Photoshop how to bend your flat design around fabric folds. Without it, your art sits on top of the photo instead of looking printed into it.
Can I change the garment color in a PSD mockup?
Yes, in most quality templates. Look for a Hue/Saturation or Color Fill adjustment layer in the layers panel, usually grouped near the garment layer. Quality bundles, including the Streetwear Mockups Bundle, build this in by default so you can test multiple colorways without re-shooting anything.
What’s the difference between PNG and PSD mockup files?
A PNG mockup is a single flattened image — what you see is what you get, with no editing flexibility. A PSD file is layered and editable, which is why learning PSD mockup tutorial clothing brand workflows pays off: you can swap designs, change colors, and reuse the same file indefinitely.
Can I use these mockup designs for commercial listings on Etsy or Shopify?
It depends entirely on the license attached to the specific mockup you bought. S.i. Graphics packs include commercial usage rights for store listings, but free or marketplace mockups vary, so always read the license terms before publishing a listing.
How do I export my finished clothing mockup for my online store?
Once your design is placed and saved, flatten a copy of the file (Image > Duplicate, then Layer > Flatten Image) and export via File > Export As, choosing PNG or JPEG at web resolution. Keep your original layered PSD untouched so you can re-edit later.
Do I need professional graphic design skills to use mockup templates?
No. If you can use Free Transform, drag a file into a layer, and hit save, you can complete the entire how to use Photoshop mockups for clothing workflow. The templates do the heavy lifting — your job is just placing artwork and adjusting colors.